bean
Member
I use Google translate. So if you don't understand, please forgive me.
Here I guide you to run Ubuntu on Android. And moreover I've verified over the past few days, this article is meant to help those who can't afford the money. Almost a lot of people don't want to pay much for electricity. If you want, you can read my article to run Ubuntu on Android.
Why use Android instead of Raspberry PI 4?
The reason is simple, think about it. spent $55 to buy one with 4 cores 4 threads 1.5Ghz, this 1.5Ghz is 20nm. Oh man, I'd rather buy a Phone then. Now I take a comparison example, I bought Poco X3 pro. This Poco X3 pro has a 7nm CPU, 1 core is 3.0Ghz Gold, 3 cores are 2.4Ghz Silver, 4 cores are 1.8Ghz Gold + Silver. Not to mention that I want high memory read and write speeds, only Poco X3 pro can do it. Here is an example meme image:

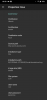
 Application Requirements
Linux Deploy (Mod for Ubuntu Focal): https://mega.nz/file/XV4EHSSY#KMrhXDm3iG94Wp9sx688PYJPordTnwz9-WGINe4lPsw
VNC: https://play.google.com/store/apps/details?id=com.realvnc.viewer.android
SSH: https://play.google.com/store/apps/details?id=com.sonelli.juicessh
More important. Is your phone required to have root
Ok. Now we proceed to install Ubuntu on Android
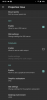
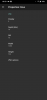
Step 1: Setting to install Ubuntu
Choose as shown in the picture
NOTE: I recommend leaving "User Name" as root. If you do not want to, then you will be solely responsible for the inconvenience later. "Image Size" is minimum 20000Mb. And I like it to be 30000Mb. Ex4 is the fastest speed
Where "Localization" is to allow displaying UTF-8 text. If you are Russian, Japanese, Chinese, Vietnamese,... Then choose your own language.
-----------------------

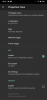
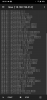
Where "Mount" "Enable - Allow to mount Android Resources" is the storage connection in the phone. The image above is an example. It has a file called "sdcard" in the external storage in Ubuntu.
------------------------
If you want to use SSH, then check the small box "SSH". In addition, if you want to use VNC, do the same as SSH.
The most optimal setting for VNC:
This is the best aspect ratio for Android
-----------------------
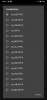
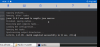
Install now!!!
Select "Install"
Then Select "OK"
Root permission
And wait for successful installation when it shows "Deploy"
Fast installation or not depends on the speed of your home network

=========End 1=========
Step 2: How to Install java 8, java 11, NetbeansIDEA, Intellij and Run Nukkit
Press the "START" button to start running Ubuntu OS
SSH and VNC connection is "localhost"
I use SSH, to easily enter commands
After you get into SSH. Enter the command as follows:
sudo apt-get update && sudo apt-get upgrade
Java8: sudo apt-get install openjdk-8-jre -y && sudo apt-get install openjdk-8-jdk -y
Java11: sudo apt-get install openjdk-11-jre -y && sudo apt-get install openjdk-11-jdk -y
Other: sudo apt-get install maven -y && sudo apt-get install nano -y && sudo apt-get install git -y && sudo apt-get install zip -y && sudo apt-get install wget -y
---------------------
Note: At this step you must connect VNC
Install NetBeansIDEA:
Open Terminal
wget https://archive.apache.org/dist/netbeans/netbeans/12.0/Apache-NetBeans-12.0-bin-linux-x64.sh
chmod +x Apache-NetBeans-12.0-bin-linux-x64.sh
./Apache-NetBeans-12.0-bin-linux-x64.sh
The rest you install yourself
When you are installing NetbeansIDEA there is /usr. Then please select /usr/lib/jvm/your java name
Done
============
VNC is required to run and install like NetbeansIDEA
Install Intellij:
wget https://download.jetbrains.com/idea/ideaIC-2020.3.4.tar.gz
Open the folder in VNC, then select the Intellij file you downloaded. Then press two fingers on the screen and select "Extract Here"
After successfully extracting, you go to the "bin" folder and open the terminal in the "bin" folder of the Intellij folder
Enter the command as follows:
chmod +x idea.sh
./idea.sh
And enjoy
=============
Just running Nukkit is simple, if anyone doesn't know how to run Nukkit on Ubuntu, then Ok. I will show newbies

Go to the folder containing the Nukkit.jar file and open the terminal in the folder where the Nukkit.jar is located
Enter the command as follows:
java -jar Nukkit.jar
If you want more dedicated Nukkit ram
java -Xms4G -Xmx4G -jar Nukkit.jar
And mine is like this
java -server -Xms8096M -Xmx8096M -XX:+UseConcMarkSweepGC -XX:+UseParNewGC -XX:+CMSIncrementalPacing -XX:+AggressiveOpts -jar pm3.jar
Benefits of Using Linux Deploy on Android
Easy to carry around, Make a Code with friends at the park. Less electricity costs.
Why is root required to use Linux Deploy?
Simply put, when using root for Linux Deploy will help your phone run at full capacity. So never use Ubuntu on Termux. It's a mistake to use Ubuntu on Termux without root
Good luck !!!
Here I guide you to run Ubuntu on Android. And moreover I've verified over the past few days, this article is meant to help those who can't afford the money. Almost a lot of people don't want to pay much for electricity. If you want, you can read my article to run Ubuntu on Android.
Why use Android instead of Raspberry PI 4?
The reason is simple, think about it. spent $55 to buy one with 4 cores 4 threads 1.5Ghz, this 1.5Ghz is 20nm. Oh man, I'd rather buy a Phone then. Now I take a comparison example, I bought Poco X3 pro. This Poco X3 pro has a 7nm CPU, 1 core is 3.0Ghz Gold, 3 cores are 2.4Ghz Silver, 4 cores are 1.8Ghz Gold + Silver. Not to mention that I want high memory read and write speeds, only Poco X3 pro can do it. Here is an example meme image:
Application RequirementsLinux Deploy (Mod for Ubuntu Focal): https://mega.nz/file/XV4EHSSY#KMrhXDm3iG94Wp9sx688PYJPordTnwz9-WGINe4lPsw
VNC: https://play.google.com/store/apps/details?id=com.realvnc.viewer.android
SSH: https://play.google.com/store/apps/details?id=com.sonelli.juicessh
More important. Is your phone required to have root
Ok. Now we proceed to install Ubuntu on Android
Step 1: Setting to install Ubuntu
Choose as shown in the picture
NOTE: I recommend leaving "User Name" as root. If you do not want to, then you will be solely responsible for the inconvenience later. "Image Size" is minimum 20000Mb. And I like it to be 30000Mb. Ex4 is the fastest speed
Where "Localization" is to allow displaying UTF-8 text. If you are Russian, Japanese, Chinese, Vietnamese,... Then choose your own language.
-----------------------
Where "Mount" "Enable - Allow to mount Android Resources" is the storage connection in the phone. The image above is an example. It has a file called "sdcard" in the external storage in Ubuntu.
------------------------
If you want to use SSH, then check the small box "SSH". In addition, if you want to use VNC, do the same as SSH.
The most optimal setting for VNC:
This is the best aspect ratio for Android
-----------------------
Install now!!!
Select "Install"
Then Select "OK"
Root permission
And wait for successful installation when it shows "Deploy"
Fast installation or not depends on the speed of your home network
=========End 1=========
Step 2: How to Install java 8, java 11, NetbeansIDEA, Intellij and Run Nukkit
Press the "START" button to start running Ubuntu OS
SSH and VNC connection is "localhost"
I use SSH, to easily enter commands
After you get into SSH. Enter the command as follows:
sudo apt-get update && sudo apt-get upgrade
Java8: sudo apt-get install openjdk-8-jre -y && sudo apt-get install openjdk-8-jdk -y
Java11: sudo apt-get install openjdk-11-jre -y && sudo apt-get install openjdk-11-jdk -y
Other: sudo apt-get install maven -y && sudo apt-get install nano -y && sudo apt-get install git -y && sudo apt-get install zip -y && sudo apt-get install wget -y
---------------------
Note: At this step you must connect VNC
Install NetBeansIDEA:
Open Terminal
wget https://archive.apache.org/dist/netbeans/netbeans/12.0/Apache-NetBeans-12.0-bin-linux-x64.sh
chmod +x Apache-NetBeans-12.0-bin-linux-x64.sh
./Apache-NetBeans-12.0-bin-linux-x64.sh
The rest you install yourself
When you are installing NetbeansIDEA there is /usr. Then please select /usr/lib/jvm/your java name
Done
============
VNC is required to run and install like NetbeansIDEA
Install Intellij:
wget https://download.jetbrains.com/idea/ideaIC-2020.3.4.tar.gz
Open the folder in VNC, then select the Intellij file you downloaded. Then press two fingers on the screen and select "Extract Here"
After successfully extracting, you go to the "bin" folder and open the terminal in the "bin" folder of the Intellij folder
Enter the command as follows:
chmod +x idea.sh
./idea.sh
And enjoy
=============
Just running Nukkit is simple, if anyone doesn't know how to run Nukkit on Ubuntu, then Ok. I will show newbies
Go to the folder containing the Nukkit.jar file and open the terminal in the folder where the Nukkit.jar is located
Enter the command as follows:
java -jar Nukkit.jar
If you want more dedicated Nukkit ram
java -Xms4G -Xmx4G -jar Nukkit.jar
And mine is like this
java -server -Xms8096M -Xmx8096M -XX:+UseConcMarkSweepGC -XX:+UseParNewGC -XX:+CMSIncrementalPacing -XX:+AggressiveOpts -jar pm3.jar
Benefits of Using Linux Deploy on Android
Easy to carry around, Make a Code with friends at the park. Less electricity costs.
Why is root required to use Linux Deploy?
Simply put, when using root for Linux Deploy will help your phone run at full capacity. So never use Ubuntu on Termux. It's a mistake to use Ubuntu on Termux without root
Good luck !!!
Last edited: