Starlk
Member
To create Cloudburst plugins, you've to import the Cloudburst library. Fortunately, there are many ways to do that. Therefore, we're here going to talk about one of those ways. However, even though it's easy to just follow this short tutorial, but it's recommended to have previous knowledge in Maven and Java.
First of all, you need to find where your .xml file is located.
After opening the file, copy and paste this Maven code to that file.
You should put it before the last line in your .xml file, which is "</project>".
Get it here.
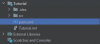
If you pasted the code, you should load the Maven repository.
If your IDE is Intellij Idea, just click on this button.
For different IDEs, it is somewhat similar, must be.

And... Tadaa! You're now basically to code some neat plugins for Cloudburst.
Feel free to ask, suggest, or even correct me, thank you for reading.
First of all, you need to find where your .xml file is located.
After opening the file, copy and paste this Maven code to that file.
You should put it before the last line in your .xml file, which is "</project>".
XML:
    <properties>
        <maven.compiler.source>1.8</maven.compiler.source>
        <maven.compiler.target>1.8</maven.compiler.target>
    </properties>

    <repositories>
        <repository>
            <id>nukkit-repo</id>
            <url>https://repo.nukkitx.com/maven-snapshots</url>
        </repository>
    </repositories>

    <dependencies>
        <dependency>
            <groupId>org.cloudburstmc</groupId>
            <artifactId>cloudburst-server</artifactId>
            <version>1.0.0-SNAPSHOT</version>
            <scope>provided</scope>
        </dependency>
</dependencies>If you pasted the code, you should load the Maven repository.
If your IDE is Intellij Idea, just click on this button.
For different IDEs, it is somewhat similar, must be.
And... Tadaa! You're now basically to code some neat plugins for Cloudburst.
Feel free to ask, suggest, or even correct me, thank you for reading.