- Compatible API Versions
- 1.0.11
- Sourcecode
- https://github.com/JoseLuisHD/libCitizen
Citizen Library
Personally I have always liked the styles of the npc like those that are in the Minecraft Java Edition servers, but in Minecraft Bedrock Edition it can be very complex to make them for plugin developers who are just starting out or most only decide to use line breaks. This library will help all developers to integrate npc with MC Java Edition styles to Bedrock Edition servers, besides being easier to integrate them in plugins or minigames.

Dependencies:
Setup Example
Building a Citizen

You can easily place the skins of the npcs with the CitizenSkin class that has support for normal skins and with geometry.
NameTags
Citizen has a simple way to place the NameTags since all the calculations work on the API side. In order to manipulate the NameTags we must access the editor option, for this it can be done in this way.
Once we access the editor we can start to place the NameTags. For them we have the putLine () function, there are two ways to call the putLine () function. The first one only asks for the String and will add the NameTags in an ascending way with the default value of a line break.
The second form asks for String and an int which means how many lines you want to skip.
Complete example
To edit the text of a NameTag, you can do the following.
In this way, the NameTag text will be updated and the players who can see the citizen will be updated with the new format.
Actions
For a citizen to execute actions when a player touches the citizen you must create a class that extends the InvokeAttribute.
For the citizen to call the class when the player touches him, you must add him to the citizen.
If you're using the library's default controllers, citizen done! but if you are using your own controllers, to call the citizen actions you can do it this way.
Controllers
A citizen requires help from some controllers to function properly. Currently the library adds these controllers automatically if you add the Citizen to the factory.
If you are an experienced developer or want to create your own controllers, you should extend the class to Controllers.
Controller class example
If you create your own controllers, the initialization of the library will be different.
NOTE: If you use your own controllers, you can still use factory as a storage system.
Personally I have always liked the styles of the npc like those that are in the Minecraft Java Edition servers, but in Minecraft Bedrock Edition it can be very complex to make them for plugin developers who are just starting out or most only decide to use line breaks. This library will help all developers to integrate npc with MC Java Edition styles to Bedrock Edition servers, besides being easier to integrate them in plugins or minigames.
Dependencies:
XML:
    <dependencies>
        <dependency>
            <groupId>org.citizen</groupId>
            <artifactId>libCitizen</artifactId>
            <version>1.0-SNAPSHOT</version>
            <scope>system</scope>
            <systemPath>${basedir}/lib/libCitizen.jar</systemPath>
        </dependency>
     </dependencies>
Java:
import cn.nukkit.plugin.PluginBase;
import org.citizen.CitizenLibrary;

public class Loader extends PluginBase {
    private CitizenLibrary library;

    @Override
    public void onEnable() {
        library = new CitizenLibrary(this);
    }
}
Java:
Citizen citizen = new Citizen();
citizen.setPosition(new Position(11, 4, 11, getServer().getDefaultLevel()));
citizen.setYaw(20);
citizen.setPitch(0);
citizen.setSkin(CitizenSkin.from(new File(getDataFolder() + "/skins/").toPath().resolve("mySKin.png")));
You can easily place the skins of the npcs with the CitizenSkin class that has support for normal skins and with geometry.
Java:
        //normal
        citizen.setSkin(CitizenSkin.from(new File(getDataFolder() + "/skins/").toPath().resolve("mySKin.png")));

        //with geometry
        Path path = new File(getDataFolder() + "/skins/").toPath();
        citizen.setSkin(CitizenSkin.from(
                path.resolve("mySKin.png"),
                path.resolve("geo.json"),
                "custom.geo.skin")
);Citizen has a simple way to place the NameTags since all the calculations work on the API side. In order to manipulate the NameTags we must access the editor option, for this it can be done in this way.
Java:
citizen.getEditor()
Java:
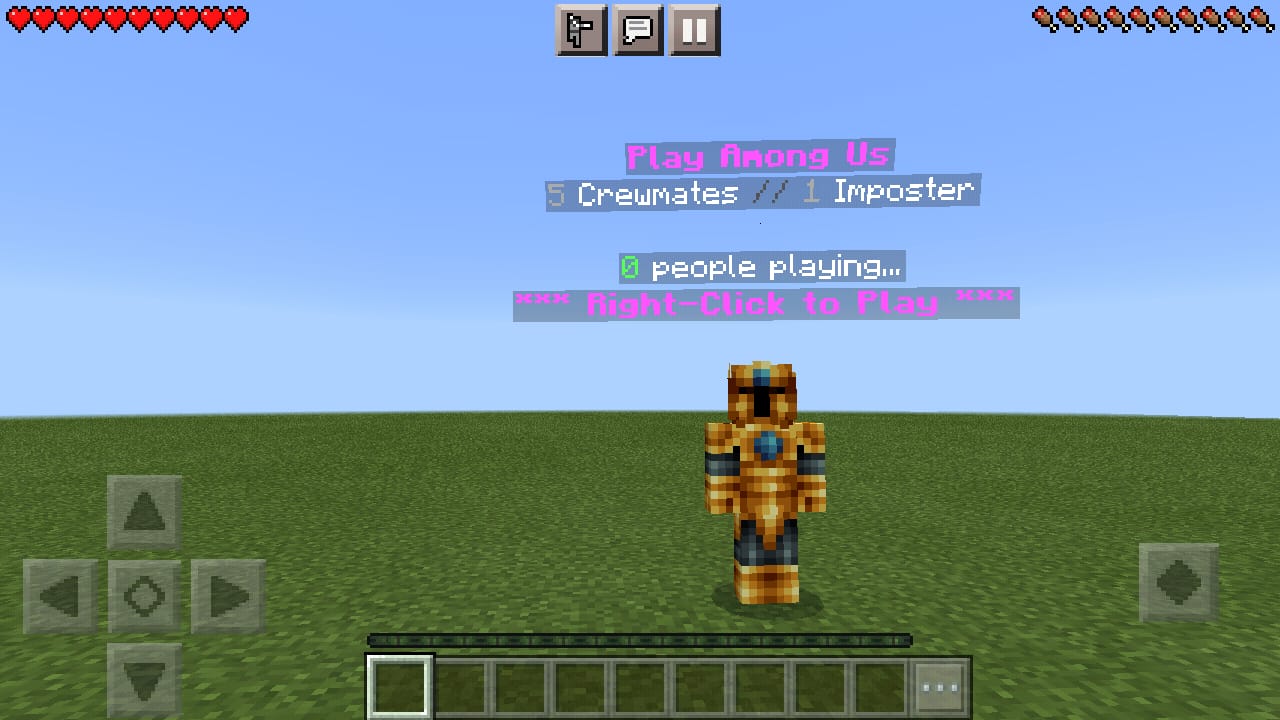
citizen.getEditor().putLine("§l§d*** Right-Click to Play ***");
Java:
citizen.getEditor().putLine("§75§f Crewmates §8// §71§f Imposter", 2);
Java:
Citizen citizen = new Citizen();
citizen.setPosition(new Position(11, 4, 11, getServer().getDefaultLevel()));
citizen.setYaw(20);
citizen.setPitch(0);
citizen.setSkin(CitizenSkin.from(new File(getDataFolder() + "/skins/").toPath().resolve("mySKin.png")));
citizen.getEditor().putLine("§l§d*** Right-Click to Play ***");
citizen.getEditor().putLine("§a0 §fpeople playing...");
citizen.getEditor().putLine("§75§f Crewmates §8// §71§f Imposter", 2);
citizen.getEditor().putLine("§l§dPlay Among Us");
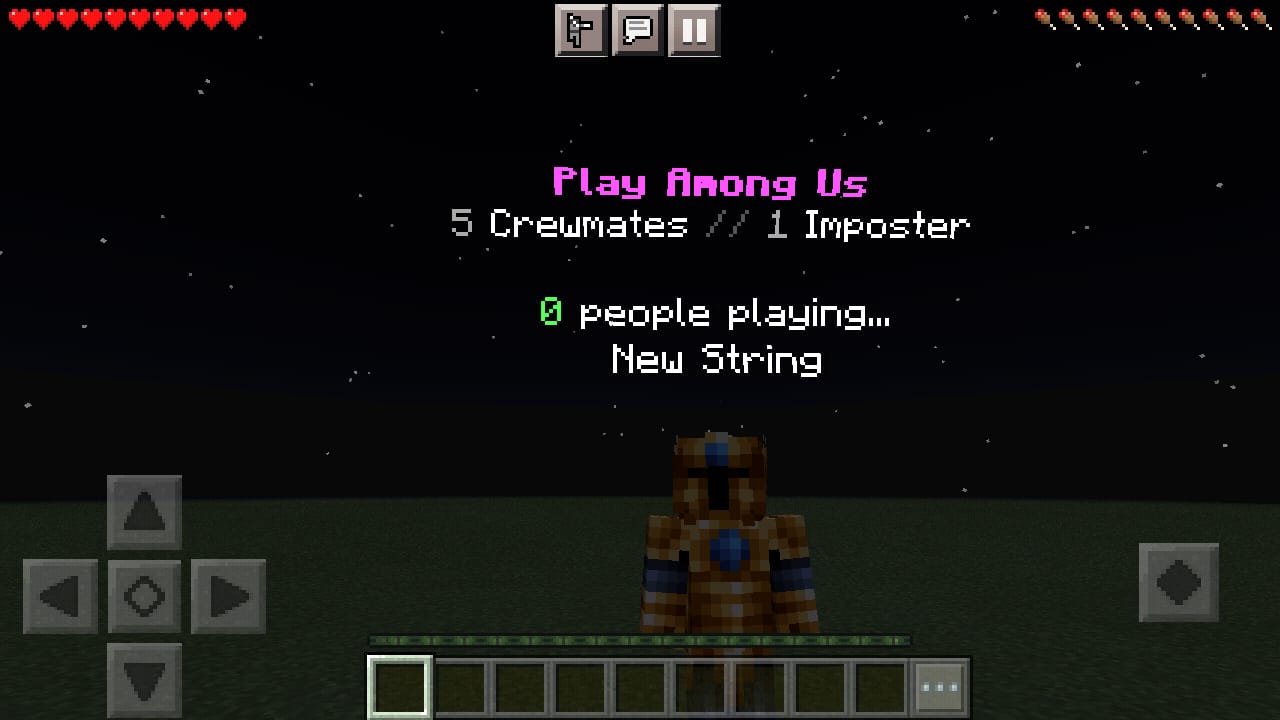
library.getFactory().add(citizen);To edit the text of a NameTag, you can do the following.
Java:
citizen.getEditor().getLine(1).rename("New String").sendNameTag();Actions
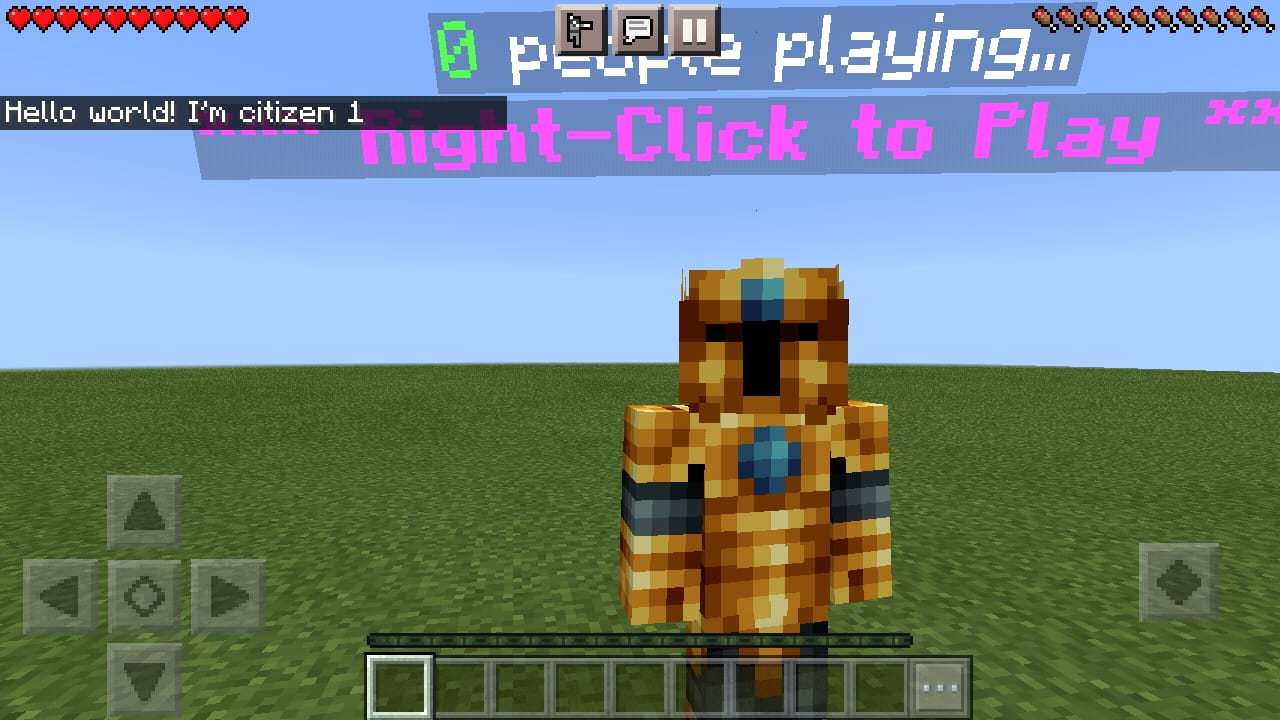
For a citizen to execute actions when a player touches the citizen you must create a class that extends the InvokeAttribute.
Java:
public class HandleAction extends InvokeAttribute {
    public HandleAction(Citizen citizen) {
        super(citizen);
    }

    @Override
    public void invoke(@NonNull Player player) {
        player.sendMessage("Hello world! I'm citizen " + getCitizen().getEntityId());
    }
}
Java:
citizen.setInvokeAttribute(new HandleAction(citizen));
Java:
citizen.callInvoke(player);Controllers
A citizen requires help from some controllers to function properly. Currently the library adds these controllers automatically if you add the Citizen to the factory.
Java:
library.getFactory().add(citizen);
Java:
import org.citizen.controller.Controllers;

public class MyCustomControllers extends Controllers {
    public MyCustomControllers(CitizenLibrary library) {
        super(library);
    }
}
Java:
public class MyCustomControllers extends Controllers {
    public MyCustomControllers(CitizenLibrary library) {
        super(library);
    }

    @Override
    @EventHandler(priority = EventPriority.NORMAL)
    public void handle(DataPacketReceiveEvent event) {
        DataPacket packet = event.getPacket();
        Player player = event.getPlayer();

        if (packet instanceof InventoryTransactionPacket && ((InventoryTransactionPacket) packet).transactionType == InventoryTransactionPacket.TYPE_USE_ITEM_ON_ENTITY) {

            TransactionData data = ((InventoryTransactionPacket) packet).transactionData;

            if (data instanceof UseItemOnEntityData) {
                Citizen citizen = getLibrary().getFactory().getCitizen(((UseItemOnEntityData) data).entityRuntimeId);

                if (citizen == null) return;

                citizen.callInvoke(player);
            }
        }
    }

    @Override
    @EventHandler(priority = EventPriority.NORMAL)
    public void handle(PlayerJoinEvent event) {
        Player player = event.getPlayer();

        getLibrary().getFactory().getCitizens().forEach((id, citizen) -> {
            if (citizen.getPosition().getLevel().getFolderName().equals(player.getLevel().getFolderName()))
                citizen.spawn(player);
        });
    }

    @Override
    @EventHandler(priority = EventPriority.NORMAL)
    public void handle(PlayerQuitEvent event) {
        Player player = event.getPlayer();

        getLibrary().getFactory().getCitizens().forEach((id, citizen) -> citizen.despawn(player));
    }

    @Override
    @EventHandler(priority = EventPriority.NORMAL)
    public void handle(EntityLevelChangeEvent event) {
        Entity entity = event.getEntity();

        if (!(entity instanceof Player))
            return;

        Player player = ((Player) entity);
        Level origin = event.getOrigin();
        Level target = event.getTarget();

        getLibrary().getFactory().getCitizens().forEach((id, citizen) -> {
            String citizenLevelName = citizen.getPosition().getLevel().getFolderName();
            if (citizenLevelName.equals(origin.getFolderName()))
                citizen.despawn(player);

            if (citizenLevelName.equals(target.getFolderName()))
                citizen.spawn(player);
        });
    }
}
Java:
import cn.nukkit.plugin.PluginBase;
import org.citizen.CitizenLibrary;

public class Loader extends PluginBase {
    private CitizenLibrary library;

    @Override
    public void onEnable() {
        library = new CitizenLibrary(this, new MyCustomControllers(library));
    }
}